Keep your Kubernetes cluster clean: Building a simple automated tool for deleting evicted pods
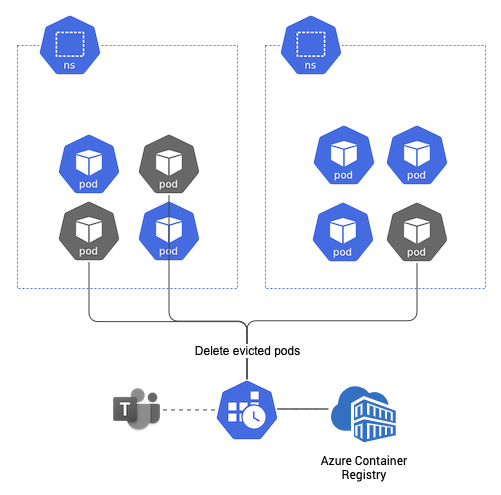
If you’ve ever managed a Kubernetes cluster, you’re probably no stranger to evicted pods. They can pile up, cluttering your cluster and making it harder to keep things organized. But there’s good news! With a bit of scripting and a simple Kubernetes CronJob, you can keep your cluster clean without lifting a finger. This article walks you through creating a fully automated tool to delete these evicted pods and even notify you when it’s done.
Why evicted pods pile up and why you should care
Evicted pods are Kubernetes’ way of dealing with resource constraints - when memory or storage runs low, the cluster clears out some pods to make space for new ones (there are other reasons, but theory is not the main purpose of this article). But evicted pods don’t automatically disappear. Over time, they can build up, obscuring the health of your deployments and making it difficult to manage your cluster. By automating their removal, we regain control and clarity.
Building the tool
Our solution uses a Kubernetes CronJob to regularly clean up evicted pods in Azure Kubernetes Service (AKS), ensuring your cluster stays fresh. We’ll also add a notification feature to keep you informed on the results of each cleanup.

Default Pod garbage collection settings
In Azure Kubernetes Service (AKS), the default value for --terminated-pod-gc-threshold(maximum number of terminated pods that kubelet retains, and once this number is exceeded, it starts deleting the oldest terminated pods) is typically set to 125 pods. This value is generally sufficient for most use cases, providing a reasonable balance between retaining terminated pods for diagnostics and freeing up resources.
However, AKS does’t allow direct modification of the --terminated-pod-gc-threshold setting for kubelet, as it is fully managed by Azure and many of its configurations are not accessible for change. If you need stricter control over the deletion of evicted pods, you can address this by using a custom script in a CronJob that regularly checks for and deletes evicted pods as needed.
Diagnostic information
In our case, we immediately send logs to Splunk, ensuring that we don’t lose critical data when pods are deleted. This approach maintains a balance between cluster hygiene and retaining diagnostic information for long-term improvements.
Here’s how to build it, step-by-step.
Step 1: Work environment preparation
To effectively build, test and fine-tune the script for detecting and deleting evicted pods, it’s beneficial to create a simulated environment rather than waiting for a natural occurrence of evicted pods. We can easily perform this simulation on Azure Kubernetes Service (AKS) with a single node. In this case, we are using a node in a Virtual Machine Scale Set (VMSS) with a size of Standard_D8s_v3.
Eviction can occur not only due to memory shortages but also in other situations, such as when the emptyDir volume is filled up. To simulate this, we’ll create a resource-exhausting deployment that fills the available space in an emptyDir volume, leading to pod evictions.
1 | apiVersion: apps/v1 |
In my case, the first pods were spotted in the Evicted state in about a few minutes.
Step 2: Crafting the cleanup script
Our core task is to identify and delete evicted pods.
1 | $ k get pod |
It’s not possible to use kubectl with --field-selector with status.phase=Evicted because “Evicted” is not one of the defined lifecycle phases for a pod. Instead, “Evicted” is classified as a Reason under status.reason, which unfortunately isn’t supported by --field-selector.
In this case, the status.phase is set to Failed, so we need to filter based on that phase and then further narrow down using jq or another tool to identify pods with the status.reason as “Evicted”. This approach ensures that we only target the correct pods for cleanup without affecting other failed pods that might need attention.
Using kubectl, we can query all pods, filter out the evicted ones with jq, and remove them. To make it efficient, we’ll run everything in a single command pipeline:
1 | kubectl get po -A -o json | jq --raw-output '.items[] | select(.status.reason!=null) | select(.status.reason | contains("Evicted")) | "\(.metadata.namespace) \(.metadata.name)"' | awk '{cmd="kubectl delete po "$2" --namespace="$1;system(cmd)}' |
This script retrieves the namespaces and names of all evicted pods, then deletes them. Of course, assuming you have sufficient rights.
1 | pod "emptydir-fill-deployment-5c8578978d-6lxhx" deleted |
Step 3: Adding notifications for better insights
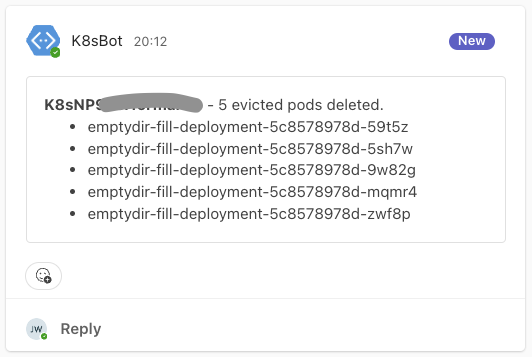
Wouldn’t it be nice to know when pods are deleted without manually checking? We’ll add a Microsoft Teams notification. Here’s how it works:
- Format the deleted pods list: This turns each deleted pod into a simple list.
- Send a notification: We use
curlto send a structured message to a MS Teams webhook.
1 | if [ "$evicted_pods_count" -gt 0 ]; then |
This sends a notification every time the script deletes evicted pods, helping you keep track of your cluster’s health.

While our example uses MS Teams for notifications, there are many other ways to keep track of automated cluster cleanup events. Here are a few alternative options that might better fit your infrastructure or alerting setup:
- Prometheus metrics with Pushgateway
- Slack notifications
- Email notifications via SMTP
- Integration with Incident Management tools (PagerDuty, OpsGenie)
- Logging to a centralized log system (e.g., ELK Stack, Splunk)
Each of these options provides flexibility, allowing you to tailor the notification method to your team’s preferred tools. This flexibility ensures that automated Kubernetes maintenance aligns seamlessly with your existing infrastructure and alerting strategies.
Step 4: Docker image
As the next step, let’s build a Docker image with the necessary binaries for our Kubernetes cleanup tool. This image will include curl, jq, and kubectl, making it fully equipped to handle our script’s requirements.
Here’s the Dockerfile for building the image:
1 | # Base image with Alpine Linux for minimal footprint |
1 | # az login |
Step 5: Wrapping it up in a Kubernetes CronJob
To automate our tool, let’s wrap it in a Kubernetes CronJob. Here’s the full YAML configuration:
The script inside is designed as a basic illustrative example of how to automate the deletion of evicted pods in Kubernetes. While it demonstrates key concepts and provides a starting point, it is not a production-ready solution.
Before using this script in a production environment, consider customizing and enhancing it to suit your specific cluster setup and requirements. This may include adding error handling, rate limiting, logging, and more robust security checks as described in Improvements section.
1 | apiVersion: batch/v1 |
This CronJob will run the cleanup script every 10 minutes. If any evicted pods are found and deleted, a notification is sent to Microsoft Teams.
Step 6: Security
To interact securely with the Kubernetes API from a pod, the recommended approach is to use service account credentials. By default, each pod is associated with a service account, which provides a credential (token) stored at /var/run/secrets/kubernetes.io/serviceaccount/token within the pod’s filesystem. This token allows the pod to authenticate with the Kubernetes API server.
Since our script requires access to resources across all namespaces (using the --all-namespaces flag in the kubectl command), we need to create a ClusterRole and assign it to the ServiceAccount. This ClusterRole is configured with minimal permissions, specifically to allow listing and deleting pods only, ensuring security by limiting the scope of actions.
Required Components:
- ServiceAccount: The pod will use this service account to authenticate with the API.
- ClusterRole: Grants permissions to perform specific actions on the pod resources.
- ClusterRoleBinding: Links the service account to the
ClusterRole, enabling the permissions across all namespaces.
RBAC Configuration:
The following configuration sets up a ClusterRole named aks-robot with the necessary permissions for pod manipulation and binds it to a specified ServiceAccount.
1 |
|
Improvements: Optimizing and scaling the evicted pod deletion tool
Once you have the basic version of the evicted pod deletion tool running, there are several ways to improve and optimize it. These enhancements will make the tool more efficient, scalable, and easier to manage in different environments. Here are some advanced tips for taking your solution to the next level.
- Parallel deletion for faster cleanup
- Error handling and logging
- Rate limiting for large clusters
- Monitoring deletion metrics with prometheus (already mention in notification section)
- Dynamic configuration with environment variables (eg.
TEAMS_HOOKvariable is definitely adept for secret)
Final Thoughts
By building this tool, you’re taking a proactive approach to cluster management. Automating the deletion of evicted pods not only improves your cluster’s health but also makes it easier for you and your team to focus on more pressing tasks. This tool is a small but powerful step toward better Kubernetes hygiene - keeping your environment clean and organized so you can keep innovating with confidence.
Sources
- https://kubernetes.io/docs/reference/generated/kubectl/kubectl-commands
- https://kubernetes.io/docs/tasks/job/automated-tasks-with-cron-jobs/
- https://kubernetes.io/docs/concepts/overview/working-with-objects/field-selectors/
- https://kubernetes.io/docs/tasks/run-application/access-api-from-pod/
- https://learn.microsoft.com/en-us/microsoftteams/platform/webhooks-and-connectors/how-to/connectors-using?tabs=cURL%2Ctext1#send-messages-using-curl-and-powershell
- https://kubernetes.io/docs/concepts/workloads/pods/pod-lifecycle/#pod-phase
- https://kubernetes.io/docs/reference/kubectl/jsonpath/

